
Good exposure is the foundation of every successful photograph. It determines whether your image appears vivid and rich in detail or flat and difficult to recognise. But what does ‘correct exposure’ actually mean?
The human eye has a fairly high dynamic range, which is related to our complex nervous system. This influences our viewing habits in such a way that we are often disappointed when we see the results of a photograph. With film, the dynamic range was quite small because it was based on the subtractive colour model, whereas digital photography now uses the additive colour model. The difference between these two colour models is quite significant: the subtractive colour model uses colour pigments, while the additive colour model uses light. When colour is added in the subtractive colour model, the colour becomes darker, while in the additive colour model, the colour becomes lighter.
What is exposure?
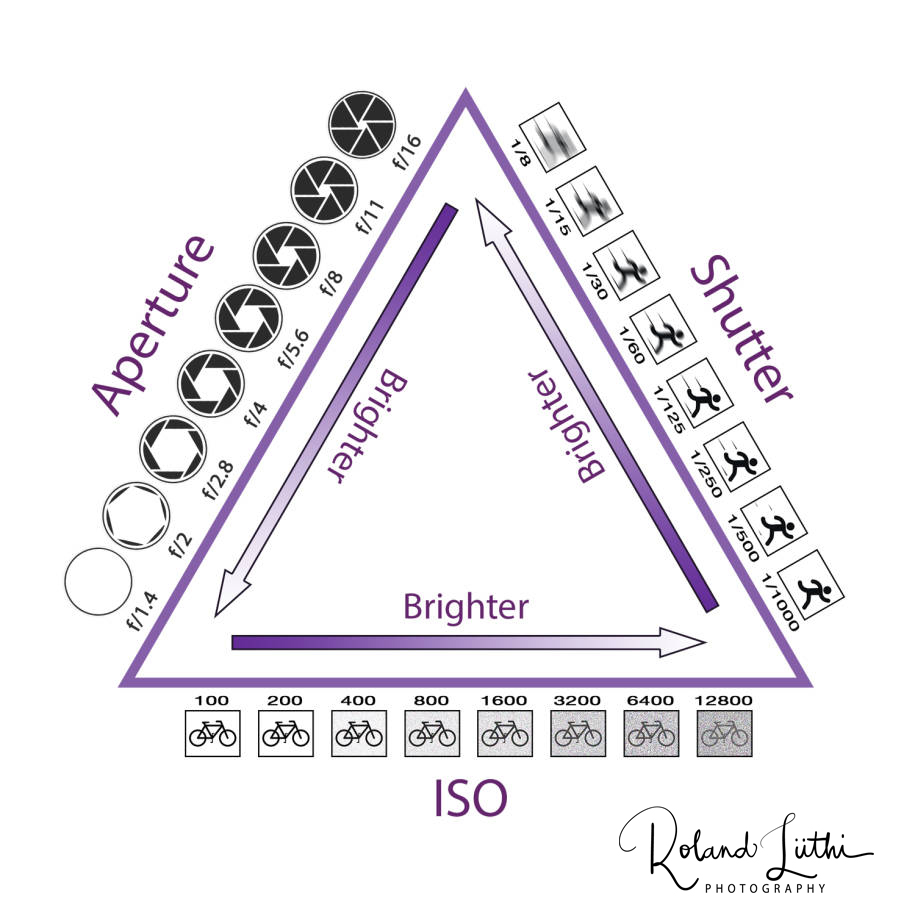
Exposure describes how much light falls on the camera sensor (or film). It consists of three central components – the so-called exposure triangle:
-
- Aperture – Controls the opening of the lens. A large aperture (e.g. f/1.8) lets in a lot of light and results in a shallow depth of field, while a small aperture (e.g. f/16) lets in less light but provides more sharpness in the image.
- Shutter speed – Specifies how long light hits the sensor. Short speeds (e.g. 1/1000 s) freeze motion, while longer speeds (e.g. 1/30 s) create motion blur.
- ISO value – Determines the light sensitivity of the sensor. A low ISO value (e.g. 100) produces clean, noise-free images, while a high ISO (e.g. 3200) is useful in low light conditions – but often comes with more image noise.
How do you find the right exposure?
- Use your camera's exposure meter. Most cameras show in the viewfinder or display whether an image is over- or underexposed.
- Pay attention to the histogram. It gives you an objective assessment of the brightness distribution in the image.
- Exposure bracketing. Photograph the same subject with different exposures and choose the best version later.
Aperture and f-stop
Aperture and f-stop are not the same thing. The aperture is usually calculated from the front lens diameter and the focal length, which is also referred to as the light intensity of a lens. However, this is only a rule of thumb, which is not always accurate, especially with wide-angle lenses, where only a small part of the front lens is used. The construction of a lens is subject to various quality requirements, one of which is distortion at the edges of the image. With wide-angle lenses, the curvature of the front lens must be greater in order to allow for a larger angle of view. However, to prevent edge distortion from becoming too noticeable, the front lens is made larger than is actually necessary. Aperture values can be quite confusing for some people, because the smaller the number, the larger the aperture. However, this is related to how it is calculated. The aperture is always calculated as a factor of the maximum usable area. The maximum usable area is always the value 1. An aperture of 1.4 is therefore 1 divided by 1.4, which means it is opened to a factor of 0.714. However, this means that with an aperture of 16, only a factor of 0.0625 is used. This factor thus corresponds to the proportion of the usable area. If the aperture values are calculated mathematically, these values are logical in themselves because the aperture value consists of a fraction. Since modern cameras display the aperture values on the screen and they are rarely engraved on the lens, it is only for convenience that we do not refer to aperture 1/5.6.
The Nikon noct 58mm lens with an aperture of 0.95 is a special case here, as its engineering allows it to capture more light than the lens diameter would normally allow.
The aperture not only controls the amount of light that falls on the sensor/film, but also affects the depth of field. Here we talk about open aperture, closed aperture and favourable aperture.
- Open aperture: With an open aperture, the shallowest depth of field is achieved. This can be used creatively to isolate the main subject. This is particularly useful when a busy background distracts too much from the main subject.
- Closed aperture: With a closed aperture, the greatest depth of field is achieved. The closed aperture is therefore mainly used in landscape photography. However, be careful: if you close the aperture too much, it can lead to diffraction blur. Just because a lens has an aperture of f: 1/22 does not mean that you have to use it.
- The optimal aperture: The optimal aperture occupies a special position here. This varies from lens to lens. It even varies between lenses from the same manufacturer and the same series. These differences result from the mounting accuracy of the individual lens elements. The optimal aperture can be measured for each lens using the Siemens star.
But be careful, aperture and f-stop are not the same thing. In photography, you usually work with so-called f-stop lenses, i.e. with the aperture, while in cinema you work with T-stop lenses. The so-called fast lenses are therefore more likely to be T-stop lenses, which also include the transmission of the glass used in the values.
Exposure time
The first photograph in history had a very long exposure time. In analogue photography, it was photons that converted the silver salts in the emulsion into silver. Anything that did not receive photons was washed out during development. Where silver remained, blackening occurred, creating a negative image that was converted back into a positive image by exposure to paper.
In digital photography, silver is no longer used; it is replaced by a light-sensitive semiconductor element made of silicon. When photons hit the sensor, individual electrons are released from it. These are then used to create the image.
However, what both processes have in common is that the longer the exposure time, the brighter the end result. But it affects the sharpness in the same way as opening the iris diaphragm. However, in the case of exposure time, it is not the depth of field that is affected, but rather motion blur. This occurs in two ways: either the subject moves or the camera moves (camera shake). This motion blur is often used deliberately, a good example being in sports photography: This creates the impression that the landscape is passing by the Formula 1 car, rather than the vehicle passing by the landscape. However, in normal cases, such motion blur should be avoided; no one wants a portrait in which the person's face is unrecognisable. Motion blur caused by camera shake is minimised using technical means in the camera and/or the lens. However, it often makes sense to use a tripod. Long exposures can make busy places appear deserted. Or you can make the sea appear as a smooth surface of water.
A special feature is the flash sync speed. This is the shortest time during which the camera's focal-plane shutter is fully open. At shorter shutter speeds, only a narrow slit runs across the sensor/film, resulting in unevenly exposed images. If a flash unit has a burn time of 1/7000 second, while a narrow slit runs across the sensor/film in 1/250 second, this results in an unattractive effect.
Light sensitivity ISO
The ISO value is a combination of the ASA values (American) and the old DIN values (German), such as ISO 100/21°. In analogue photography, this value describes the actual sensitivity of the film to light. A higher ISO value was produced by the grain size of the silver salts, which is why this is visible in the enlargements due to the grain.
In digital photography, on the other hand, it merely serves as a reference point for the image processor to determine how much the sensor's signal needs to be amplified – which can lead to increased noise, as the sensor has a fixed base sensitivity. In digital photography, I use the ISO setting simply to ensure that a value for the amplification is passed on to the image processor. This amplification affects the image quality, resulting in image noise.
What is an exposure value?
The exposure value is a standardised unit of measurement in photography that describes the amount of light available and represents a group of equivalent combinations of aperture and exposure time that result in the same image brightness. Simply put, it indicates how much light is available and helps you find the right settings for correct exposure. The higher the exposure value, the more light is available – and vice versa. The exposure value is based on a logarithmic scale. The reference value is EV 0, which corresponds to an aperture of f/1 with an exposure time of 1 second. Each increase of 1 EV doubles the amount of light, which means that you can either open the aperture, extend the exposure time or adjust the ISO sensitivity to compensate for the exposure. The mathematics behind exposure values The formula for exposure value is:
EV = log₂ (f² / t)
- f= aperture number (e.g. f/2.8)
t = exposure time in seconds
This formula also takes ISO sensitivity into account (ISO 100/21° by default). For higher ISO values, the effective exposure value decreases because the film is more sensitive to light. In practical terms, this means that at EV 10, you could choose an aperture of f/8 at 1/125 second – or the equivalent of f/5.6 at 1/250 second. This allows for flexibility depending on your creative goal (e.g. depth of field or motion blur). Why are exposure values important? Exposure values are the key to accurate exposure metering. Modern cameras automatically measure the EV value and suggest settings, but understanding them helps you to make manual corrections. For example:
- In low light (low EV, e.g. EV 5 indoors), you need to open the aperture or increase the ISO to avoid underexposure.
- In bright sunlight (high EV, e.g. EV 15), you can prevent overexposure by using a smaller aperture or shorter shutter speeds.
Light values also play a role in exposure compensation (+/- EV): a compensation of +1 EV doubles the amount of light, which is ideal for bright subjects against a dark background. Without this knowledge, you risk taking flawed photos, especially in difficult lighting conditions such as backlighting or night photography. Practical examples and tips
Imagine you are photographing a sunset: the exposure meter shows EV 12. You select an aperture of f/11 for maximum sharpness and adjust the shutter speed to 1/60 second – perfect for balanced exposure. Or for portraits in the shade (EV 8): open the aperture to f/2.8 to capture soft light without noise from high ISO. Tips for getting started:
- Use your camera's exposure meter: many models display the EV value directly.
- Experiment with bracketing: Take a series of shots with varying EV values (+/-1) to find the best exposure.
- Apps and tools: There are apps such as ‘Light Meter’ that calculate EV values and help you plan without a camera.
- Consider ISO: At ISO 400/27°, the effective EV decreases by 2 stops compared to ISO 100/21°.
Conclusion: Master the light for better photos Light values are not dry theory – they are your tool for creative and technically high-quality photography. By understanding how EV affects the interaction of aperture, shutter speed and ISO, you can avoid mistakes and create impressive images. Try it out on your next shoot and see the difference!
Useful
If you want to determine the optimal aperture for your lenses, you will need a Siemens star, so I am providing two of these as PDF files for you to print out. All you need is a printer that can print in A4 or A3 format.

")
")
")
")
")
")
")
")
")